벤치마크를 통한 JSDom 오버헤드 알아보기

Jest Test Environment에 대하여 에서 node와 jsdom에 대하여 비교하면서 jsdom을 이용하는 것이 많은 퍼포먼스 오버헤드를 발생시킨다는 것을 알게 되었다. 이후 이러한 오버헤드를 직접 측정할 수 있다면 좋겠다는 생각에 방법을 찾던 중, JSDom benchmark 를 찾게 되었고 이를 통해 개인 환경에서 오버헤드를 살펴볼 수 있게 되었다.
JSDom
JSdom은 Node 환경에서 DOM과 HTML 표준과 같은 수 많은 웹 표준을 순수 JavaScript로 구현한 것이다. JSdom을 이용하면 Node 환경에서 실제 브라우저에서 실행하는 것과 같이 JavaScript 코드를 동작시킬 수 있다.
Benchmark
 jsdom benchmark
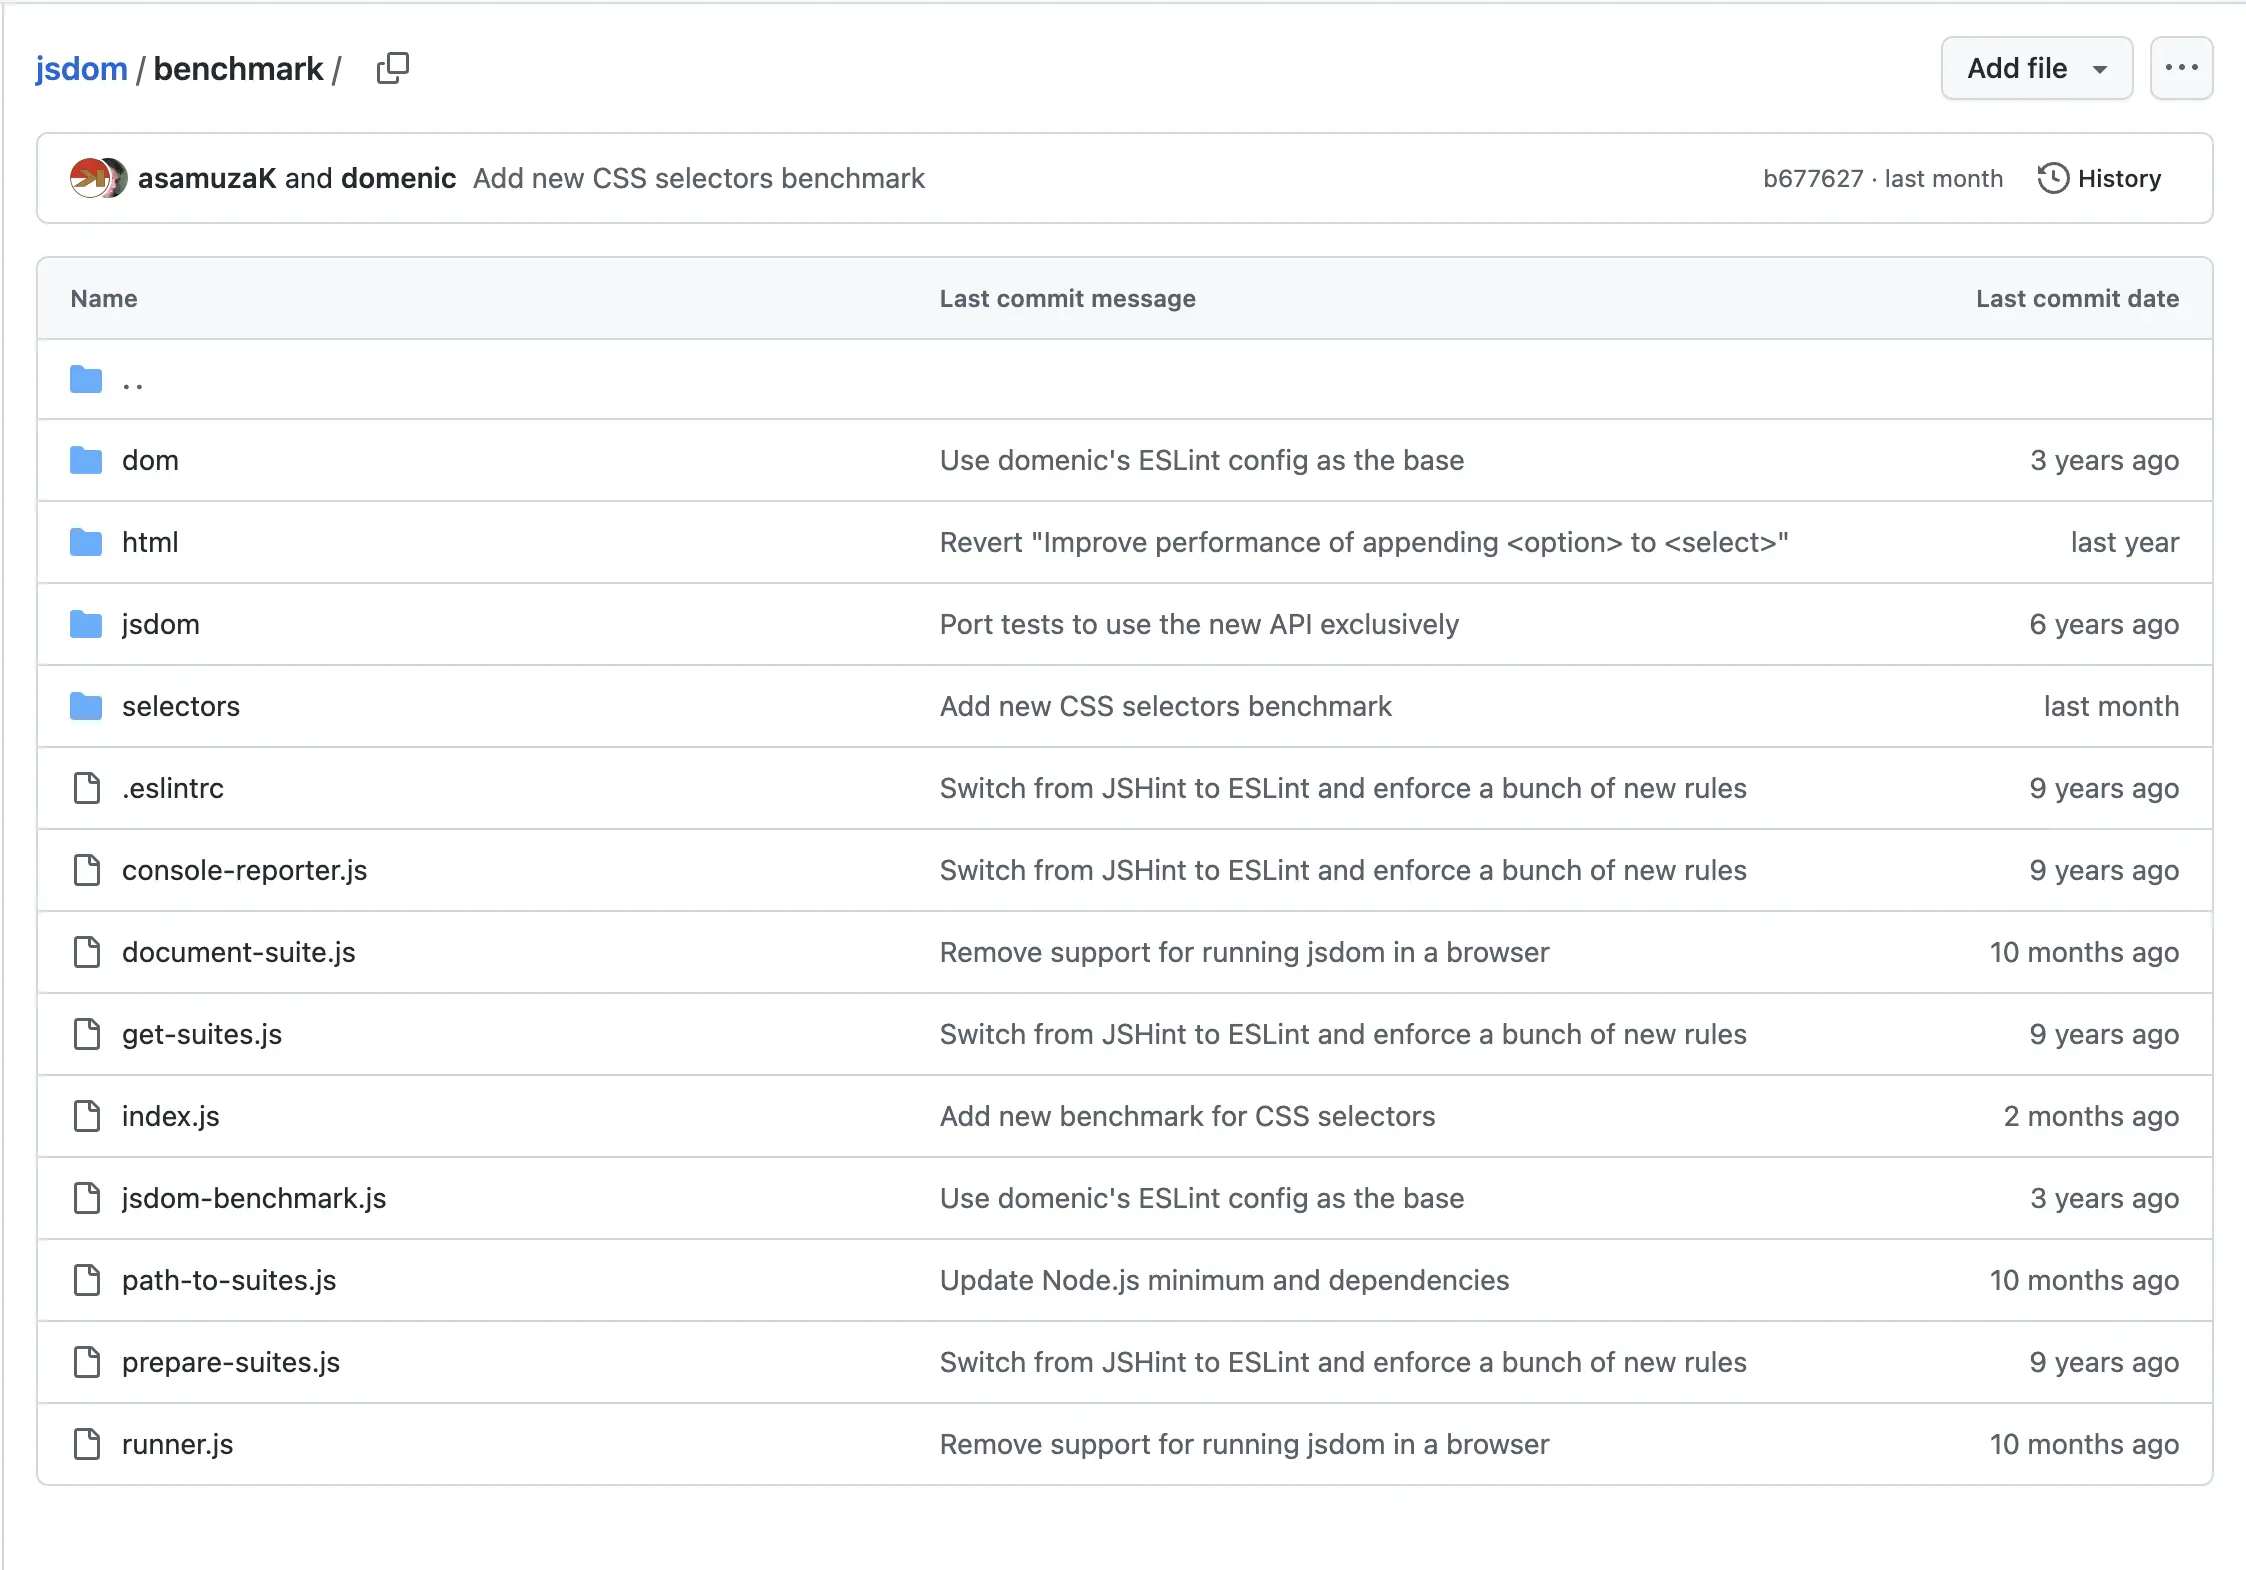
jsdom에서는 위와 같이 자체적으로 벤치마크를 제공하고 있다. jsdom/benchmark에 들어가면 dom, html, selecotrs등 다양한 벤치마크를 확인할 수 있으며 스크립트 실행을 통해 손쉽게 벤치마크 테스트를 진행할 수 있다.
jsdom에서는 벤치마크 측정을 위해 benchmark.js를 사용하고 있다.
How
벤치마크 결과를 보기에 앞서 jsdom이 어떻게 벤치마크를 측정하는지 살펴보기 위해 해당 코드를 살펴보았다.
먼저 dom, html, jsdom, selectors 폴더를 살펴보면 이곳에는 각각의 벤치마크 테스트를 위한 suite 함수들이 위치해있다. 아래는 JSDOM 생성을 테스트하는 벤치마크 테스트의 코드이다.
1
2
3
4
5
6
7
8
9
10
11
12
13
14
15
16
17
18
19
20
21
22
23
24
25
26
27
28
29
30
31
32
33
34
35
36
"use strict";
const Benchmark = require("benchmark");
const jsdomBenchmark = require("../jsdom-benchmark");
const { JSDOM } = require("../..");

exports["new JSDOM() defaults"] = function () {
  const suite = new Benchmark.Suite();

  suite.push(jsdomBenchmark({
    fn() {
      // eslint-disable-next-line no-new
      new JSDOM();
    }
  }));

  return suite;
};

exports["new JSDOM() with many elements"] = function () {
  let html = `<!doctype html><html><head><meta charset="UTF-8"><title></title></head><body>\n\n`;
  for (let i = 0; i < 1000; ++i) {
    html += `<a href='${i}.html'>${i}</a>\n`;
  }
  html += `\n</body></html>\n`;

  const suite = new Benchmark.Suite();

  suite.push(jsdomBenchmark({
    fn() {
      // eslint-disable-next-line no-new
      new JSDOM(html);
    }
  }));

  return suite;
};
이들은 runner 실행 전 prepareSuites 함수를 통해 벤치마크 Suite으로 초기화 되며 이후 runner에서 benchmarks 변수에 할당된다.
1
2
3
4
5
6
7
8
9
10
11
12
13
14
15
16
17
18
19
20
21
22
23
24
25
26
27
28
29
30
31
32
33
34
35
36
37
38
39
40
41
42
43
44
45
46
47
48
49
50
51
// prepareSuites 실행 전 benchmarks
{
  jsdom: {
    api: {
      'new JSDOM() defaults': [Function (anonymous)],
      'new JSDOM() with many elements': [Function (anonymous)]
    }
  },
  dom: {
    construction: {
      createElement: [Suite],
      createTextNode: [Suite],
      createComment: [Suite],
      createDocumentFragment: [Suite],
      createNodeIterator: [Suite],
      createEvent: [Suite],
      createProcessingInstruction: [Suite]
    },
    'tree-modification': {
      'appendChild: no siblings': [Function (anonymous)],
      'appendChild: many siblings': [Function (anonymous)],
      'appendChild: many parents': [Function (anonymous)],
      'insertBefore: many siblings': [Function (anonymous)],
      'removeChild: no siblings': [Function (anonymous)],
      'removeChild: many siblings': [Function (anonymous)],
      'removeChild: many parents': [Function (anonymous)]
    },
    'compare-document-position': {
      'compare siblings': [Function (anonymous)],
      'compare descendant': [Function (anonymous)],
      'compare ancestor': [Function (anonymous)]
    },
    'named-properties': {
      'setAttribute(): Remove a named property from window': [Function (anonymous)]
    },
    'inner-html': { tables: [Suite] }
  },
  html: { parsing: { text: [Suite] } },
  selectors: {
    'complex-selectors': {
      matches: [Function (anonymous)],
      closest: [Function (anonymous)],
      querySelector: [Function (anonymous)],
      querySelectorAll: [Function (anonymous)]
    },
    sizzle: {
      querySelectorAll: [Function (anonymous)],
      'querySelectorAll only nwsapi supports': [Function (anonymous)]
    }
  }
}
1
2
3
4
5
6
7
8
9
10
11
12
13
14
15
16
17
18
19
20
21
22
23
24
25
26
27
28
29
30
31
32
33
34
35
36
37
38
39
40
41
42
43
44
45
46
47
48
49
50
// prepareSuites 실행 후 benchmarks

{
  jsdom: {
    api: {
      'new JSDOM() defaults': [Suite],
      'new JSDOM() with many elements': [Suite]
    }
  },
  dom: {
    construction: {
      createElement: [Suite],
      createTextNode: [Suite],
      createComment: [Suite],
      createDocumentFragment: [Suite],
      createNodeIterator: [Suite],
      createEvent: [Suite],
      createProcessingInstruction: [Suite]
    },
    'tree-modification': {
      'appendChild: no siblings': [Suite],
      'appendChild: many siblings': [Suite],
      'appendChild: many parents': [Suite],
      'insertBefore: many siblings': [Suite],
      'removeChild: no siblings': [Suite],
      'removeChild: many siblings': [Suite],
      'removeChild: many parents': [Suite]
    },
    'compare-document-position': {
      'compare siblings': [Suite],
      'compare descendant': [Suite],
      'compare ancestor': [Suite]
    },
    'named-properties': { 'setAttribute(): Remove a named property from window': [Suite] },
    'inner-html': { tables: [Suite] }
  },
  html: { parsing: { text: [Suite] } },
  selectors: {
    'complex-selectors': {
      matches: [Suite],
      closest: [Suite],
      querySelector: [Suite],
      querySelectorAll: [Suite]
    },
    sizzle: {
      querySelectorAll: [Suite],
      'querySelectorAll only nwsapi supports': [Suite]
    }
  }
}
익명 함수였던 부분이 모두
Suite로 변경된 것을 확인할 수 있다.
1
2
3
4
5
6
7
8
9
// jsdom/benchmark/runner.js
let suitesToRun;
if (argv.suites) {
  suitesToRun = pathToSuites(benchmarks, argv.suites);
} else {
  suitesToRun = pathToSuites(benchmarks);
}

suitesToRun.forEach(consoleReporter);
이후 벤치마크 테스트를 위한 runner인 benchmark/runner.js를 살펴보면 pathToSuites 함수에 benchmarks를 전달하여 실행할 suites들을 결정한다는 것을 알 수 있다. 마지막으로 각각의 suite에는 consoleReporter 함수가 적용된다. 이를 통해 콘솔에서 벤치마크 결과를 볼 수 있다.
Software suite는 관련 기능을 가진 컴퓨터 프로그램의 모음을 의미한다.
1
2
3
4
5
6
7
8
9
10
11
12
13
14
15
16
17
18
19
20
21
// jsdom/benchmark/runner.js
function runNext() {
  /* eslint-disable no-invalid-this */
  if (this && this.off) {
    // there is no .once()
    this.off("complete", runNext);
  }
  /* eslint-enable no-invalid-this */

  const suite = suitesToRun.shift();
  if (!suite) {
    console.log("Done!");
    return;
  }

  suite.off("complete", runNext);
  suite.on("complete", runNext);
  suite.run({ async: true });
}

runNext();
이후 runNext 함수를 통해 벤치마크 suites들이 비동기로 실행된다.
Runner
아래의 순서에 따르면 benchmark runner를 실행할 수 있다.
- 의존성 설치
1
npm install - benchmark 실행
1
npm run benchmark
Test
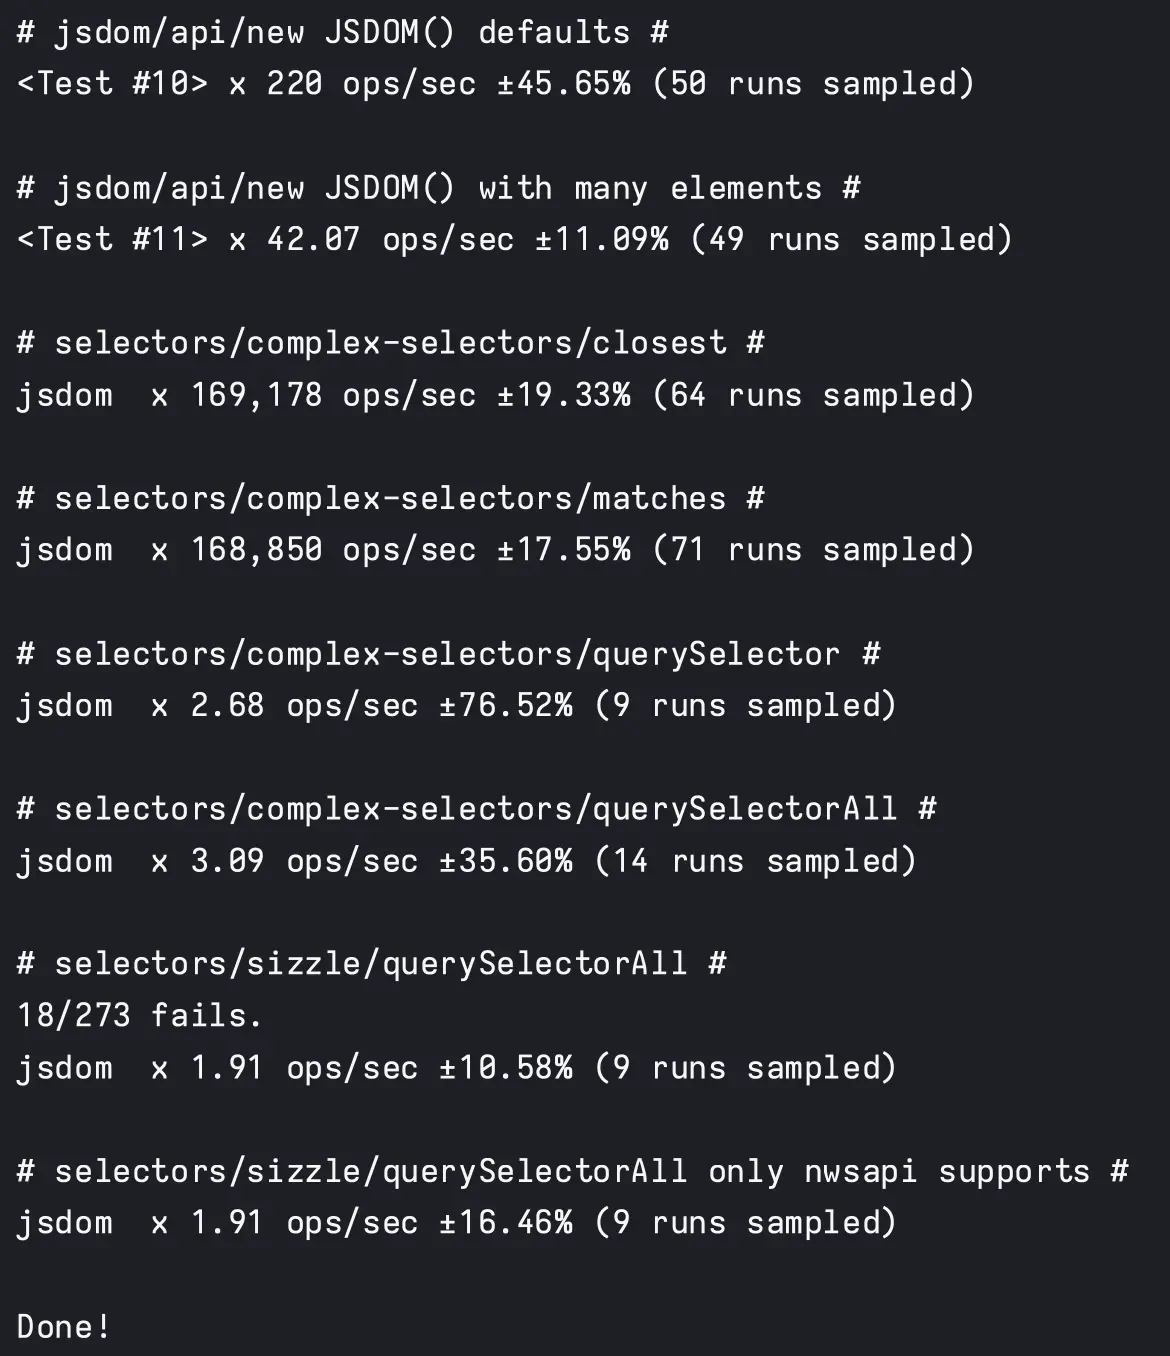
러너를 실행하면 아래와 같은 벤치마크 테스트 결과를 얻을 수 있다.
 jsdom benchmark test
ops/sec는 operations per second의 약자로, 컴퓨터나 네트워크 시스템이 초당으로 처리하는 작업의 수를 의미한다.ops/sec수치가 낮다는 것은 해당 시스템을 처리하는데 많은 비용이 발생한다는 것을 의미한다.
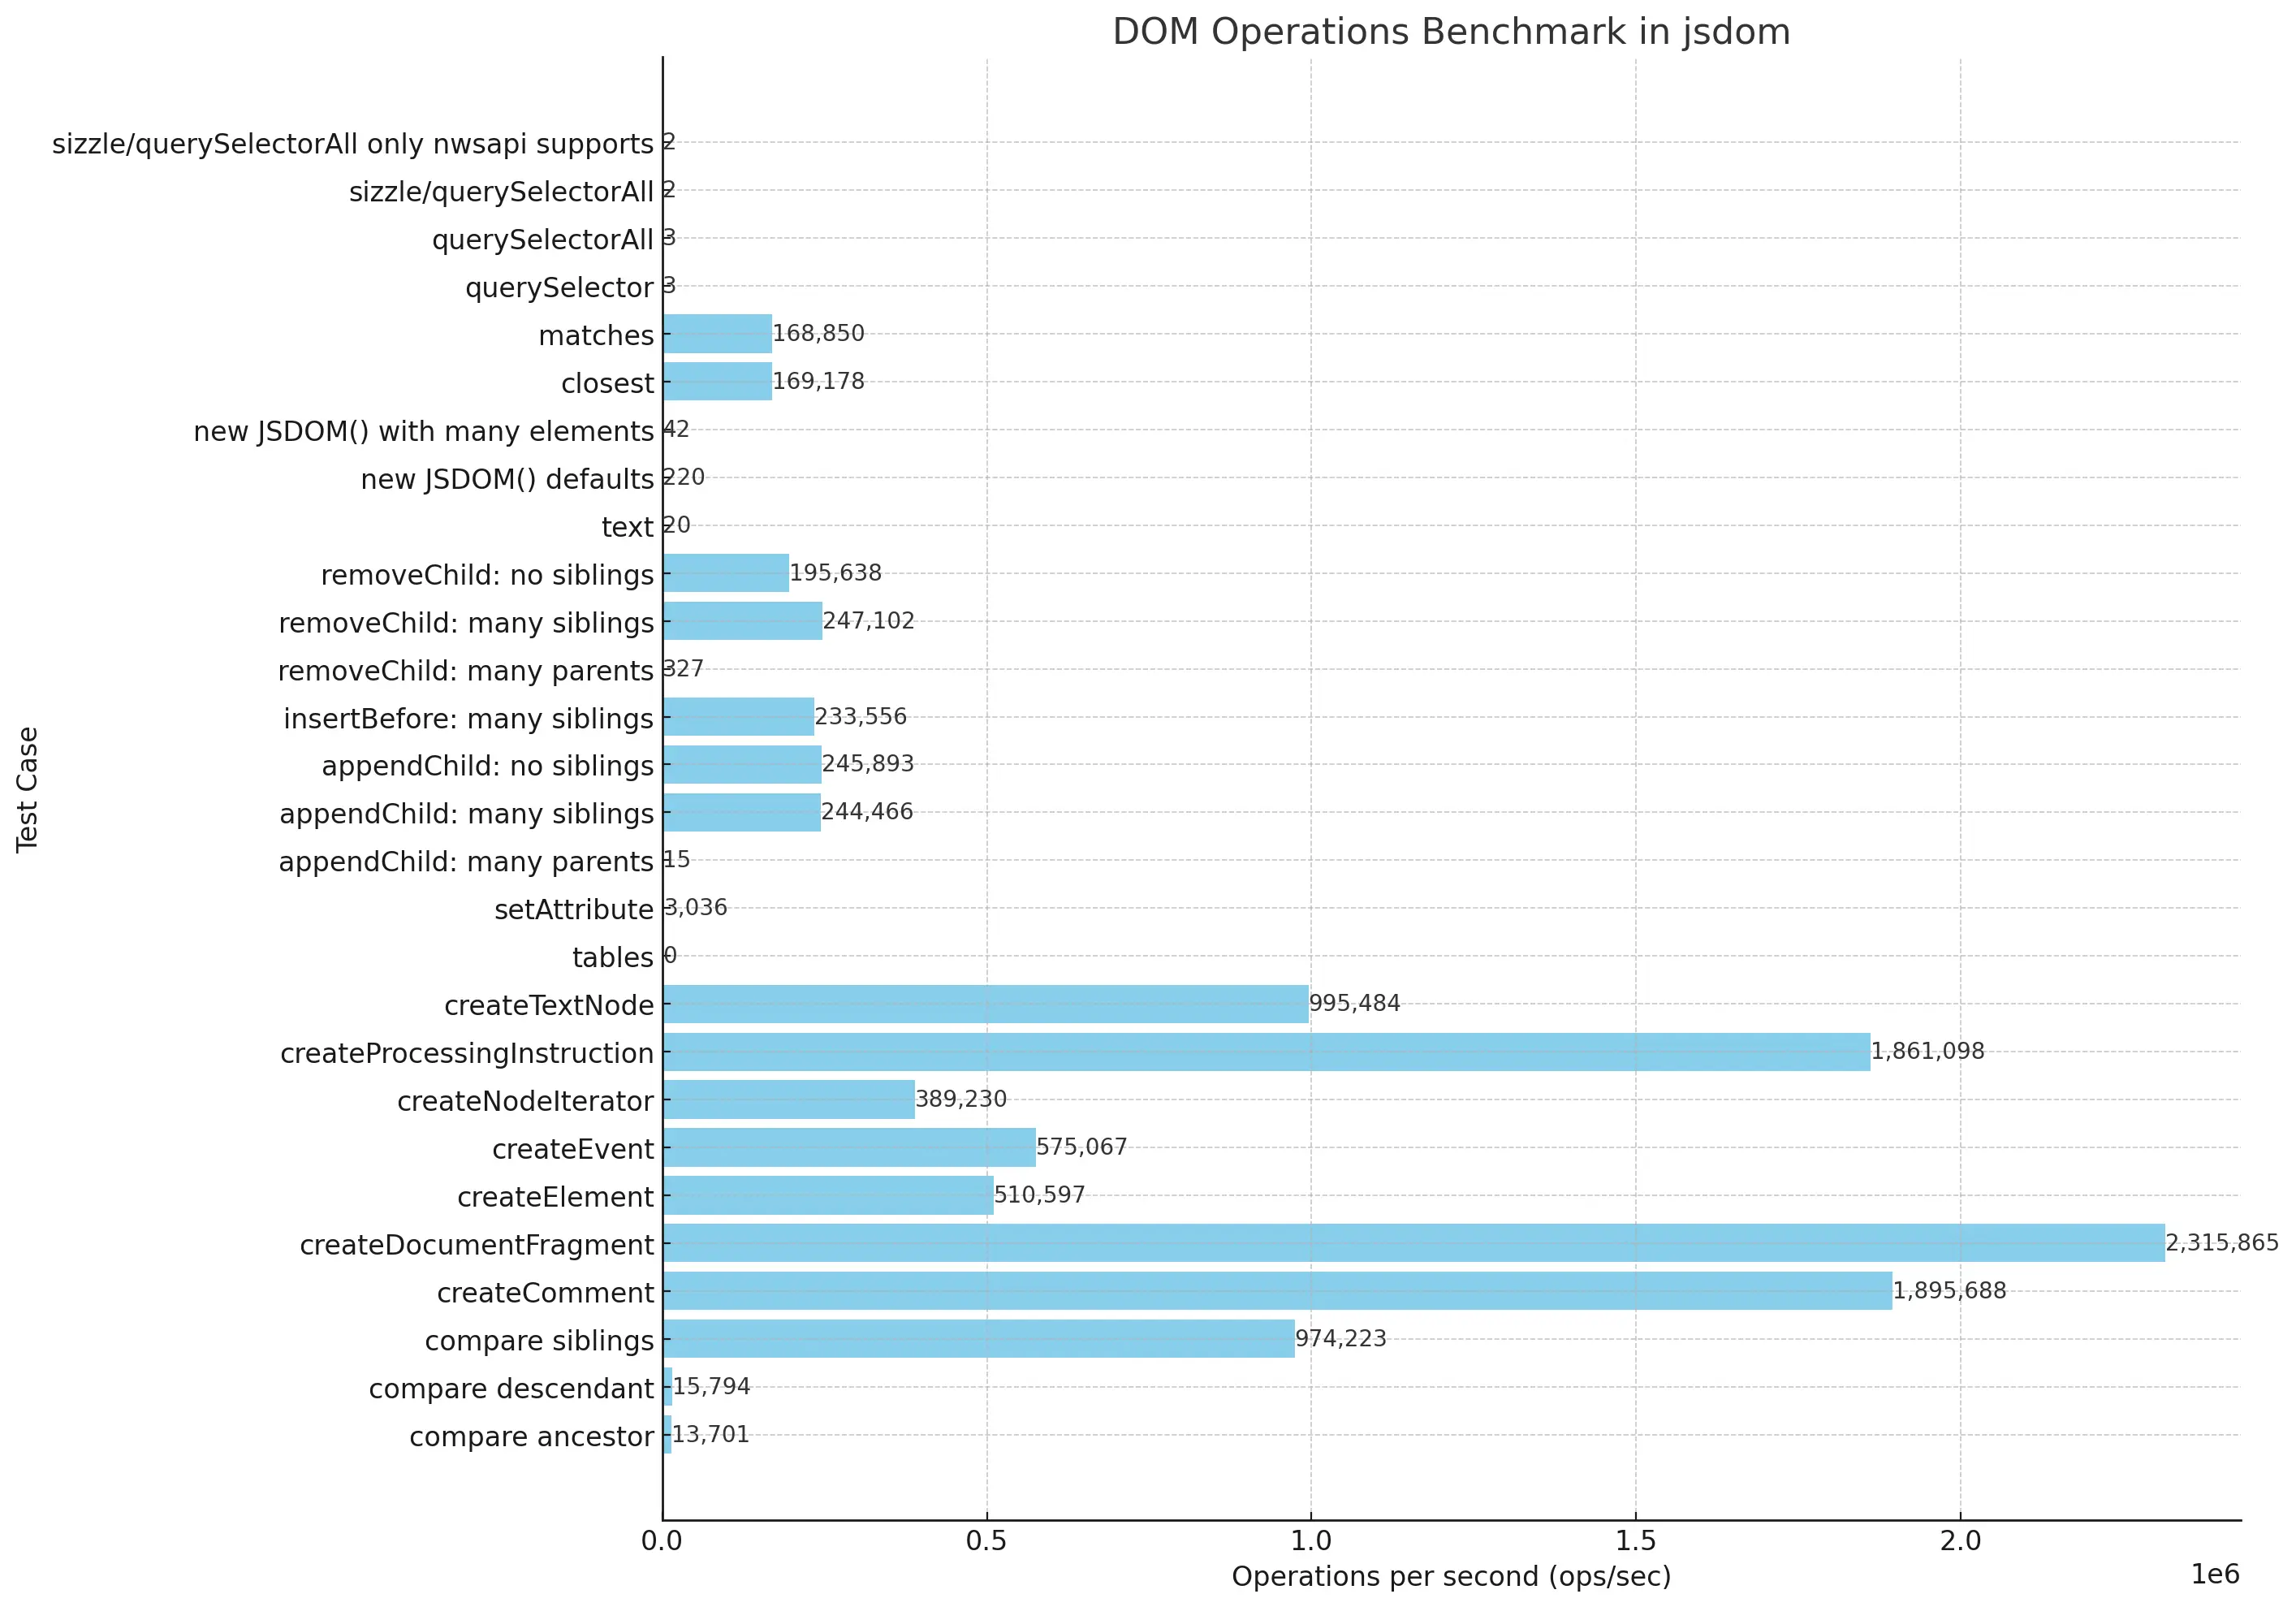
벤치마크 테스트 결과를 한눈에 보기 위해 그래프를 만들어 보면 다음과 같다.
 jsdom benchmark graph
Prediction
벤치마크 테스트 결과를 보기전에는 JSDOM을 구성하는 기능이 다른 기능들 보다 낮은 ops/sec을 가질 것이라고 예측했다. DOM 트리를 구성하는 기능이 당연히 보다 많은 오버헤드를 발생시킬 것이라고 생각했기 때문이다.
하지만 위 그래프에서 볼 수 있듯이 JSDOM 생성 이외에도 querySelector, querySelectorAll, appendChild: many parents, setAttribute, compare descendant등 낮은 ops/sec을 가지는 기능들이 존재했다. 이들은 본래 낮은 ops/sec를 가지는 걸까? 그 이유를 살펴보기 위에 벤치마크 테스트 코드를 살펴보았다.
1
2
3
4
5
6
7
8
9
10
11
12
13
14
15
16
17
18
19
20
21
22
23
24
25
26
27
28
29
30
31
32
33
34
35
36
37
38
39
40
41
42
43
44
45
46
47
48
// jsdom/benchmark/selectors/complex-selectors.js
exports.querySelector = () => {
  let node;

  return suite({
    setup(document) {
      const x = 5;
      const y = 5;
      const z = 5;
      const xFrag = document.createDocumentFragment();
      for (let i = 0; i < x; i++) {
        const xNode = document.createElement("div");
        xNode.id = `box${i}`;
        xNode.classList.add("box", "container");
        const yFrag = document.createDocumentFragment();
        for (let j = 0; j < y; j++) {
          const yNode = document.createElement("div");
          yNode.id = `div${i}-${j}`;
          yNode.classList.add("block", "outer");
          for (let k = 0; k < z; k++) {
            const zNode = document.createElement("div");
            zNode.id = `div${i}-${j}-${k}`;
            zNode.classList.add("block", "inner");
            const p = document.createElement("p");
            p.id = `p${i}-${j}-${k}`;
            p.classList.add("content");
            p.textContent = `${i}-${j}-${k}`;
            zNode.append(p);
            yNode.append(zNode);
          }
          yFrag.append(yNode);
        }
        xNode.append(yFrag);
        xFrag.append(xNode);
      }
      const container = document.createElement("div");
      container.setAttribute("id", "container");
      container.classList.add("container");
      container.append(xFrag);
      document.body.append(container);
      node = document;
    },
    fn() {
      const selector = ".box:first-child ~ .box:nth-of-type(4n) + .box .block.inner > .content";
      node.querySelector(selector);
    }
  });
};
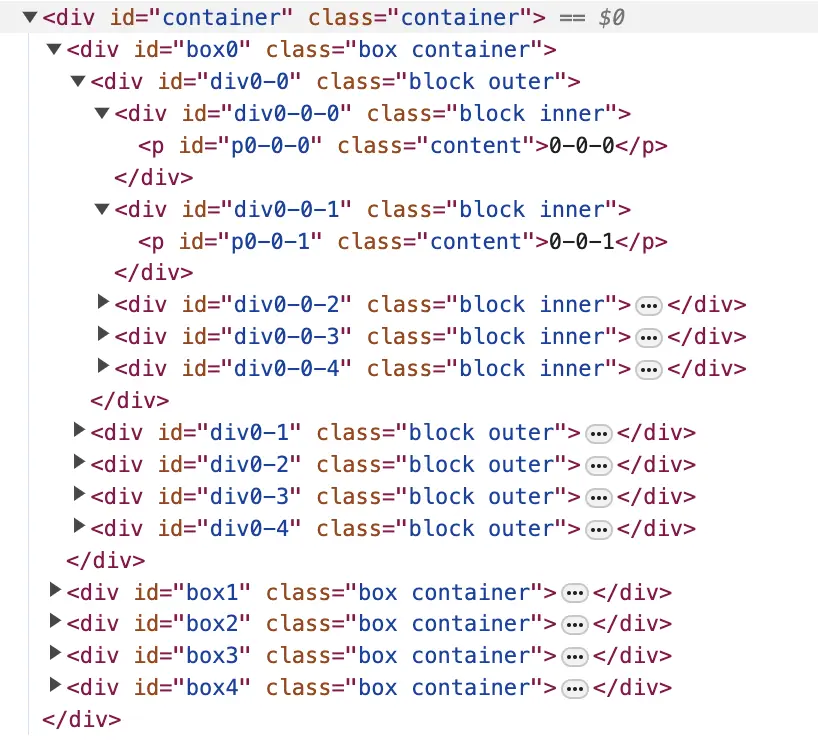
querySelector를 살펴보면 setup으로 적지 않은 양의 document를 구성한다는 것을 알 수 있다. setup으로 만들어진 document container는 다음과 같다.
 document container
우리는 많은 양을 가진 복잡한 document에서 원하는 부분을 select 하기 위해서는 보다 많은 시간이 걸릴 것이라고 예상할 수 있다. 따라서 jsdom이 제공하는 querySelector에대한 벤치마크가 낮은 ops/sec를 가지는 이유는 많은 양의 복잡한 document와 selector 때문이라고 생각할 수 있다.
이러한 생각이 적절한지 확인하기 위해 보다 간단한 document와 selector를 가진 벤치마크를 구성하여 querySelector의 동작을 살펴보고 ops/sec를 비교해보았다.
1
2
3
4
5
6
7
8
9
10
11
12
13
exports.querySelector = () => {
  let node;

  return suite({
    setup(document) {
      document.body.innerHTML = `<html><div>Hello</div></html>`;
      node = document;
    },
    fn() {
      node.querySelector("div");
    },
  });
};
setup을 위와 같이 변경하고
runner를 다시 실행한다.
 querySelector simple test
기존 querySelector 벤치마크 테스트에서 2.68 ops/sec였다면, 이번 테스트에서는 398.214 ops/sec 를 얻을 수 있었다. 이러한 테스트를 통해 간단한 document와 selector를 구성하였을 때 보다 적은 오버헤드가 발생한다는 것을 알 수 있다. 또한 복잡한 setup은 DOM 생성과 비슷한 큰 퍼포먼스 오버헤드를 발생시킨다는 것을 알 수 있었다.
jsdom에서 DOM 생성을 제외한 낮은ops/sec을 가지는 작업들은 모두 복잡한 setup을 가지고 있다.querySelector를 통해 살펴본 것과 같이 이들 모두 보다 간단한 setup을 가진다면 높은ops/sec을 가질 것이다.
Conclusion
이전 글 Jest Test Environment에 대하여 에서 Jest의 기본 테스트 환경을 node가 아닌 jsdom으로 설정한다는 것은 매 테스트에서 DOM 환경을 구성하여 테스트를 진행한다고 생각할 수 있으므로 DOM 생성을 위한 퍼포먼스 오버헤드가 발생할 것을 예상할 수 있었다. 이번 벤치마크 테스트를 통해 이러한 jsdom의 DOM 생성과 조작이 많은 퍼포먼스 오버헤드를 발생시킨다는 것을 직접 확인할 수 있었다.